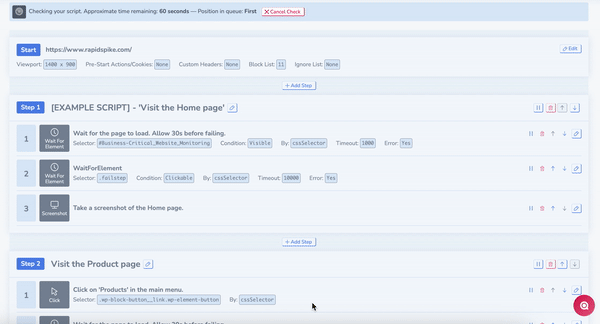
Using the Script Editor
User Journeys interact with your site using code-free scripts made up of steps and actions. You can make changes to this script using the Script Editor tool on the User Journeys Page.
The script editor can be used to:
- Create a draft of your script and check for errors before it goes live.
- Edit your script.
- Publish changes to your script.
You can learn tips and tricks to writing a good script on RapidSpike’s Academy Course.
Drafting your Script
No code is required to script a user journey. Instead, you can create a script using user-friendly steps and actions. This works as follows:
- To add a step to your journey, click Add Step. Enter a description of the step (e.g. Visit Home Page). Each step should correspond to a single page on your website.
- Click Add Action to add actions to your step. This will bring up a list of actions to interact with your page (you can see the full list and how they interact with your page here). Fill in the required fields for the action then click Add Action again to add it to your script.
- Reorder steps and actions in your script by clicking the up and down arrows.
- Pause, Edit and Delete Steps and Actions using the icons on the right.
- While you are editing your script, remember to click Save so that you do not lose any changes made to the draft script.
Test your Script
Click Save and Check to save a draft of your script and test it for errors. This means you can check and debug your script before publishing it on your account. This will pause your journey and put it into draft mode.
Publishing your Script
Once you’re ready to make your script live, click on the Save and Publish button. This will take your User Journey out of draft mode.
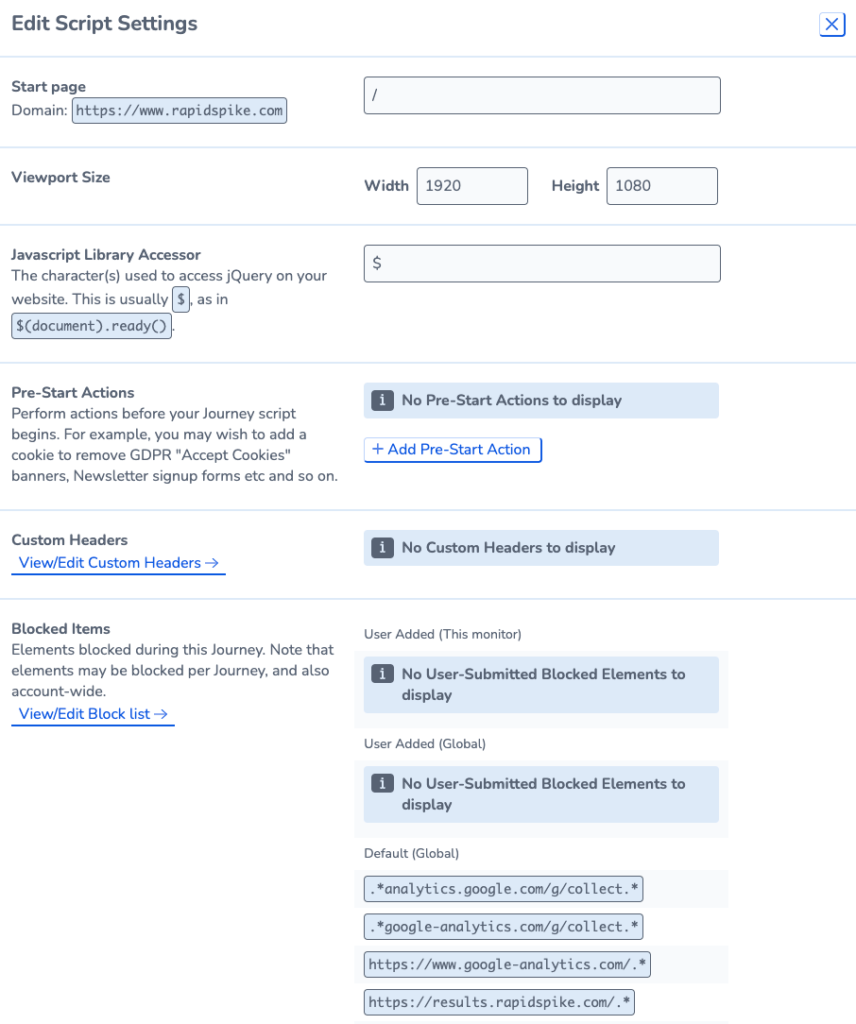
Edit Script Settings
You can edit the script settings by going to the Start step and clicking Edit. This will take you to Script settings. You can:
- Change the Start Page where the user journey begins. For example, you might want the journey to start on a particular product page.
- Add Pre-Start Actions. These are actions that take place before the user journey begins such as adding cookies, or API Requests.
- Add a JavaScript Library Accessor: this allows you to refer to the jQuery library and its functionalities.
- Change the screen size (you can also do this in User Journey Settings).
- View custom headers and blocked/ignored elements.
Edit Mode
Go to edit mode to view and edit your script in full screen. You can also:
- See a JSON file of your script. This can be used to copy your script.
- Clear your script
- Download a .txt file of your script