• Use Cases
    • Technical
    • Digital
    • eCommerce
    • Travel
    • Gambling
    • Public Sector
    • Enterprise
    • Small/Medium
    • Agencies
    • RapidSpike VS New Relic
  • Platform
    • PerformanceImprove page speed and conversions.
    • SecurityStop hackers and find vulnerabilities.
    • ReliabilityTrack errors and issues, get alerts.
    • How It WorksA quick overview of the platform.
  • Customers
  • Learn
    • About UsWe help make the web faster, safer and easier to use.
    • Knowledge BaseWe aim to answer your most frequently asked questions.
    • From The BlogGet to know feature development, monitoring tips and even the RapidSpike team.
      • Why should you use Single Sign-On?
      • The Online Travel Landscape
      • The ultimate guide to website monitoring solutions
  • Pricing
  • Log In
  • Get Started
  • Use Cases
    • Technical
    • Digital
    • eCommerce
    • Travel
    • Gambling
    • Public Sector
    • Enterprise
    • Small/Medium
    • Agencies
    • RapidSpike VS New Relic
  • Platform
    • PerformanceImprove page speed and conversions.
    • SecurityStop hackers and find vulnerabilities.
    • ReliabilityTrack errors and issues, get alerts.
    • How It WorksA quick overview of the platform.
  • Customers
  • Learn
    • About UsWe help make the web faster, safer and easier to use.
    • Knowledge BaseWe aim to answer your most frequently asked questions.
    • From The BlogGet to know feature development, monitoring tips and even the RapidSpike team.
      • Why should you use Single Sign-On?
      • The Online Travel Landscape
      • The ultimate guide to website monitoring solutions
  • Pricing
  • Log In
  • Get Started

Back to Knowledgebase

Categories

Account & Billing

Getting Started

Performance Monitoring

Alerts & Notifications

Uptime Monitoring

Security Monitoring

Synthetic User Journey Monitoring

Interpreting Data

Assurance and Search

Other Articles

Choosing Appropriate Selectors

User Journeys: Video Journeys

What is Synthetic User Journey Monitoring?

How to Create a Synthetic User Journey

A Step-By-Step Guide

Create a User Journey

Synthetic User Journeys must be added to an existing website within your account.

Note: If the website hasn’t been created yet, click the “Websites” button in the left blue menu, and then click the green “Add website button” at the top right.

  1. Click “Websites” in the left blue menu, and click on the website you want to add a user journey to.
  2. Click “User Journeys” in the left blue menu.
  1. Click the green “Add Journey” button at the top right of this page.
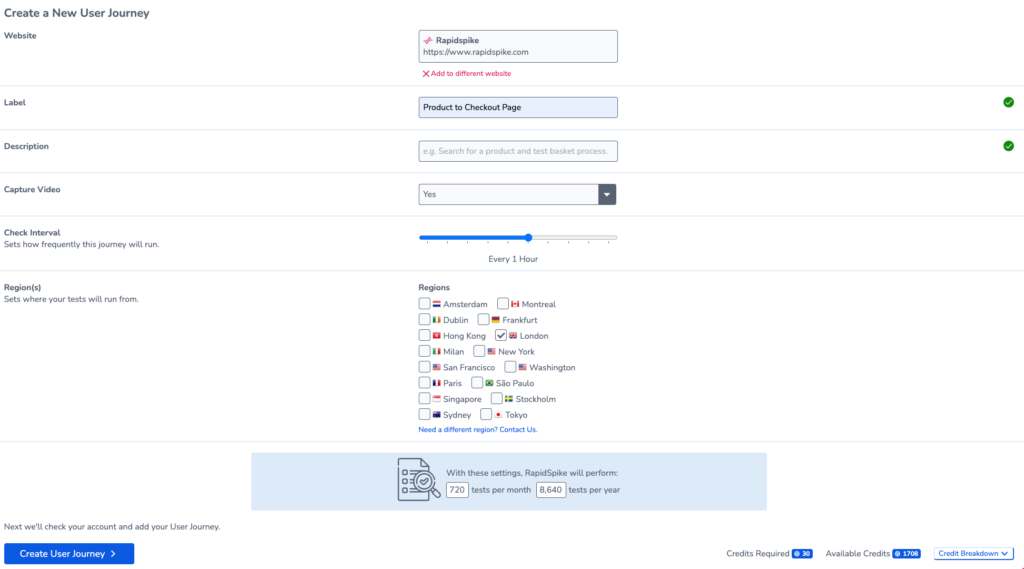
  1. Give your Journey a label – e.g. “Testing the Checkout”, and add a description (optional).
  2. Select a website from the dropdown menu if you wish to switch from the one you selected earlier.
  3. You can adjust the check interval of the journey to run between every 5 minutes, and every 24 hours.Choose your journey type, depending on your plan you may be entitled to a video journey which records the synthetic user journey taking place, making issues easier to spot.

7. You can also select a range of regions you want your user journey to be tested from.

Note: The number of regions you choose to test from, and the frequency of the check interval you choose will influence the number of credits it takes for your user journey to run.

8. Once this process has completed, click “Create Journey” to see your new User Journey.

Writing a Journey Script

User Journeys consist of a series of Steps and Actions. Each Step corresponds to a single page on your site. Actions are the things you do on each page: e.g. take a screenshot, click a button, fill in a form.

  1. To start scripting your journey, click “Script Editor” in the left blue menu.

2. In the Script Editor screen, click “Add a First Step” to start writing your Journey, and give the step a name . E.g. “Visit Home page”

You will have the option to add recommended actions which most journeys use to save you some time, don’t worry you can always edit these later if you change your mind.

3. Then click the “Add Step” button.

4. Add actions to your first step by clicking the plus icon in the center of the step box, this will open a selection window of a choice of actions you can add.

The first action is usually done with a Click action. (E.g. Click on the “Products” button in the website’s navigation). To create a new action you will need the selector of the element you wish to interact with, and you can enter comments and on-error messages to help guide people interacting with your journey script in the future.

Tip:

If you’re struggling to work out what ‘selector’ to use when interacting with an element on the page – try using the “Inspect Element” feature available in most modern browsers. To do this Visit your website, then right click and click “Inspect Element” on the element you want to click on. This will show you the source code, and you can get the CSS Selector from there. In Google Chrome, you can right-click on the source code in the Inspector and choose “Copy > Copy Selector” to get the exact CSS selector to use in the script.

5. When you’re ready to move to a new page in the Journey, click “Add Step”, you can choose the position each step is in to edit the order your journey goes through. You will have the option to pause, edit or delete each action and step in your journey to experiment and make changes.

Continue to add actions and steps to build up your Journey. As you go along, it’s a good idea to use the “Save & Check” button in the top menu. This will run your Journey and return results – letting you know if your steps are successful.

6. Once you’re happy with your script, remember to save your changes and finally, click “Publish” to begin testing your site.

See our blog post on User Journeys here!

Start your free 30-day trial today

No credit card required.

GET STARTED

RapidSpike - Global eCommerce Winner 2021
RapidSpike - Northern Digital Awards Winners
RapidSpike - Insider Yorkshires Most Exciting Companies
RapidSpike - UK Dev Awards 2021 Winner
RapidSpike - Prolific North Top Tech 30 To Watch
RapidSpike - Cyber Accelerator Alumni

Copyright © 2022 — All Rights Reserved.

RapidSpike - AWS Well Architected
RapidSpike - AWS Partner Network
  • Solutions
    • Technical
    • Digital
    • eCommerce
    • Travel
    • Gambling
    • Public Sector
    • Enterprise
    • Small/Medium
    • Agencies
    • New Relic
    • Customers
    • Pricing
  • Platform
    • Performance
    • Security
    • Reliability
    • How It Works
    • Insights
    • Alerting & Integrations
    • All Features
    • Synthetic User Journeys
    • Google Lighthouse
    • Core Web Vitals & Performance
    • Webpage Test
    • Real User Monitoring
    • Vulnerability Scanning
    • Magecart Attack Detection
    • Uptime
    • Assurance & SEO
  • Learn
    • Blog
    • Knowledge Base
    • API Documentation
    • System Status
    • RapidSpike Roadmap
    • Log In
  • Company
    • About Us
    • Contact
    • Careers
    • Press
    • Privacy Policy
    • Terms & Conditions
    • Vulnerability Disclosure