Edit User Journey Settings
User Journeys emulate the path that a real user takes when using your website or web application. This journey starts when the user visits your website and ends when the user leaves your website. In RapidSpike you can customise the settings for a User Journey. This could include pausing your monitor, changing the interval or region, deleting the monitor or a number of advanced options. Find out more about setting up a User Journey here.
Where to find User Journey Settings in RapidSpike
To access User Journey Settings, navigate to Settings > Websites, Pages, User Journeys & Sitemaps. Find the User Journey monitor you wish to edit and click on Settings.
You may also access this directly from the User Journey Monitor itself by clicking on Options and Edit > Edit User Journey.
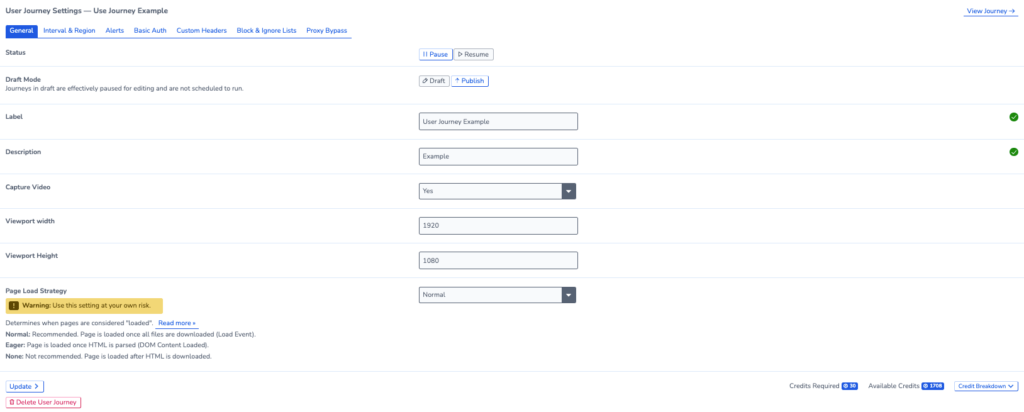
Pause, Draft and Delete your monitor in user Journey Settings:
To pause your monitor, go to User Journey Settings > General > Status. You can also place your journey into draft mode while you are making changes by selecting Draft Mode.
To delete your monitor, go to User Journey Settings > General followed by Delete this Monitor at the bottom of the page.
Add Video to your user Journey
Go to User Journey Settings > General > Capture Video to add video recordings to your journey.
Adding a video recording to your User Journey allows you to watch the tests running from start to finish, exactly as a user would. This can be useful for visualising and troubleshooting failures.
Change the Screen size
Go to User Journey Settings > General > Viewport Width + Viewport Height. This can be used to simulate desktop and mobile screens.
Changing the Interval & Region for your User Journey
Go to User Journey Settings – Interval and Region to alter how frequently the User Journey runs. You can also add or remove test regions. When making changes, you can see how many credits are required for the monitor compared to how many are available.
Recommendations:
- Critical pages – 5 minutes
- Non-critical pages – 15 minutes to 1 hour
Other Settings for Your User Journey
Change the Page Load Strategy: Go to User Journey Settings > General > Page Load Strategy. Read more here.
Configure Alerts: This can be done in User Journey Settings > Alerts
Edit a Username or Password: Found in User Journey Settings > Basic Auth
Set Custom Headers: User Journey Settings > Custom Headers
Block or Ignore elements: User Journey Settings > Block and Ignore Lists.
Proxy Bypass: User Journey Settings > Proxy Bypass