User Journeys are a powerful tool for ensuring key processes across your site are working correctly. They follow a scripted set of instructions to interact with your pages like a human visitor does – and to identify issues as they come up.
We offer a “Managed Service” for looking after your User Journey scripts, or you might prefer to use our script builder to write your own.
When writing your own Journey script, the hardest part is choosing and writing the “selectors”. When your journey runs, it follows actions – such as “click on something” or “fill in a form field”. A user journey selector is like an address – it tells the script where the item is that we want to watch for, click on, or interact with. This is done by referencing an HTML element from the page’s code.
Finding selectors
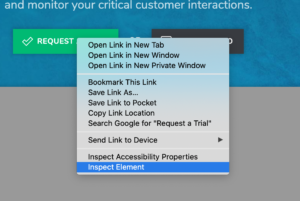
The most useful tool when writing a selector is the browser Inspector. You’ll want to open your website on the relevant page and right click and open the “Inspect Element” window. (This may be called something different depending on your browser). The window will let you see the code for the site – which you’ll need to write the selector.
What type of selector should you use?
In our script builder you have lots of options for what type of selector to use:
- id – use an element’s id attribute
- className – use an element’s class attribute
- cssSelector – use a full css path
- name – use the element’s name attribute
- linkText – use the exact text displayed to the user (applies only to <a> tags)
- partialLinkText – using any part of the text displayed to the user (applies only to <a> tags)
- tagName – matches the tag itself
- xpath – an advanced way of identifying a selector using expressions
Of the list above, we’ll focus on the first three – these will be the ones you use most often.
IDs
ID’s are great because they must always be unique – for your HTML to be valid you can only have one of each on a page. So for example, you might have an element such as
<a href="/login" id="login-button">Log In</a>
There can only be one element with the id “login-button”, so it’s a really good choice to use this as a selector – assuming this button is what you want to interact with.
In the selector field, you’d simply put the value “login-button”.
className
Class names can be tricky, because they’re not always going to be unique. For example,
<a href="/login" class="button">Log In</a>
You may have multiple “button” links on your page. To be certain that your journey picks the correct one, you’ll need to be more specific. If “button” is the only class available, it may be better to pick a different selector type.
If the class name is something you know to be unique, e.g.
<a href="/login" class="button-footer-account-login">Log In</a>
Then it may be safe to use className. In which case, you’d enter the value “button-footer-account-login”.
cssSelector
If you don’t have an ID to use, the vast majority of the time you’ll end up using cssSelector as your type. This type offers the most flexibility.
cssSelector is the “path” of an element in your website’s code. It’s what the website’s stylesheet (CSS) would use to identify an element. If you are familiar with CSS, this will be a breeze. If not, then there are some simple tricks to learn.
The cssSelector can be thought of like a postal address. If you addressed a letter too generally, e.g.:
London, England
You’d end up matching too many results! You need to be more specific;
14 Example Street, Faketown, Madeupsville, London, England
The only real difference with a cssSelector is the order – cssSelectors start off with the general location and get more specific – e.g.
England, London, Madeupsville, Faketown, Example Street, 14
Or to put it in terms of HTML:
html .site-wrapper .page-header .main-menu .menu-item a
Writing a cssSelector Selector
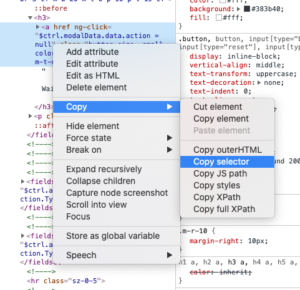
The quickest way to grab a full selector path is via your inspector. Right click on your element – e.g. the button you want to click, and click “Inspect” (Google Chrome). You’ll see the elements tab and the element itself highlighted. Right click it, go to “copy”, then click “copy selector”.
This will give you a full complete path for the element. Your path will probably look a bit like this:
body > div.wrapper > div.pricing > div.main.cf >
article > a.button.bg.large-size.friendly.bs-m.iconright
Or perhaps it might be even longer!
However – there’s a problem. The angle bracket symbols here “>” mean “only match an element that’s immediately inside”. These can be incredibly useful, but the problem is this is very inflexible. Websites change a lot – classes can be dynamic, elements can move around.
Sites also get changed slightly from time to time. In the example above, the designer of the page might change the classes used on the button. If they changed the “iconright” to be an “iconleft”, our selector would break.
We want to write a selector that won’t immediately break if a tiny change is made to the page. This selector is too specific. However if we take the gist of it, we can simplify it:
.pricing .main a.button
In this example, I know I’m working on the “pricing” page, and I can see there’s only one button inside the “main” part of the page – so I know this is a safe selector to use. I won’t match more than one element, and I know my selector isn’t too specific in case the style of the button is changed in future.
Now all I need to do is test it! I can do this using the RapidSpike Script Builder, or I can do it quickly using the Inspector window.
Using jQuery, I can add a quick line to the console to see if one or elements is matched:
jQuery(".pricing .main a.button")
Hitting enter returns the element and a “length” value of “1” so I know it has 1 match.
If jQuery is unavailable, I’d use this pure Javascript command in the console:
document.querySelectorAll(".pricing .main a.button")
Assuming this returns a single result, I know it’s safe to use in my script!
Advanced CSS
Sometimes things aren’t so simple, and we need to write more complex CSS selectors than simply a list of classes or elements like
.pricing .main a.button
Imagine I have a page with two buttons on it with identical classes. How do I select the correct button? CSS has a few tricks we can use.
Nth-Child
If we have multiple of the same element inside a block of content, we can use “nth-child” to select one based on order.
:first-child, :last-child and :nth-child(n)
This allows us to pick one – e.g. the first, last or a specific one using the number, n. In our two-button example, I could use:
.pricing .main a.button:first-child
This would pick the first of two buttons.
Immediate Child
As outlined above, “>” indicates an element that’s an immediate child of another. So if you have a page with this markup:
<section>
 <div class="box">
  <a href="/login">Login</a>
 </div>
</section>
The <a> tag is an immediate child of the “.box” <div> element. It is NOT an immediate child of the <section> tag. So my selector:
.box > a
Would work, however:
section > a
Would not work.
Siblings
In CSS we can use other syntax to select the “sibling” of an element – i.e. an element that’s alongside another – not inside it. The + symbol lets us select an element that’s directly next to another, and the ~ symbol lets us select any element that is at the same level.
For example;
<section>
 <div class="box">
  <p>Login Here</p>
  <a href="/login">Login</a>
  <a href="/register">Register</a>
 </div>
</section>
The selector
.box p + a
Would match the “login” <a> tag, but not the “register” <a> tag, because Login is a direct sibling of the <p> tag.
.box p ~ a
Would match both links, which means it is less useful for writing Journey selectors.
Note that Siblings can be a great tool for getting a tricky selector to work. However – as ever, you must be careful because if the page changes in a small way it can break the “sibling” relationship very easily. If a designer changed the order, or added a new element it would stop working.
:not
Sometimes if the elements and classes on the page aren’t helpful you can find writing the right selector becomes very tricky. You may also want to choose something dynamically – but you don’t have a class to do it.
For example, you might have a list of products and you want to pick one that is available for purchase. When products are sold, they have a class of “sold-out”.
<ul class="product-list">
 <li class="product sold-out">
  <p>Sold out!</p>
  <a href="/buy">Buy</a>
 </li>
 <li class="product sold-out">
  <p>Sold out!</p>
  <a href="/buy">Buy</a>
 </li>
 <li class="product">
  <p>Buy me!</p>
  <a href="/buy">Buy</a>
 </li>
<ul>
How do you click the available product? In these cases you can use the :not selector, which matches elements that don’t have a specific class. So you’d use:
.product-list li:not(.sold-out) a
This matches the one product that doesn’t have that class on it.
Hopefully this guide will help in writing selectors for your User Journeys. For more complex and sophisticated Journeys, sometimes we need to write long and tricky selectors and using the tactics above should help. If you need assistance with your User Journeys and would like to discuss our Managed Service, send us a message via our LiveChat or speak to the team at support@rapidspike.com.